- Solutions
-
- File Server: Ransomware Protection
- File Server: File Copy
- File Server: Audit File Access
- File Server: Storage growth reporting
- Licensing/Pricing
- Contact
NOTE: The features described below require a Satellite Monitoring Service, and thus are only available in Ultra product editions.
Secure Network Access Portal Tunnels, or "SNAP Tunnel" for short, are a means of securely tunneling arbitrary TCP/IP data from the Central Monitoring Service to a remote Satellite Monitoring Service, and vice versa. This enables point to point network connections among LANs, even if separated by firewalls or the Internet.
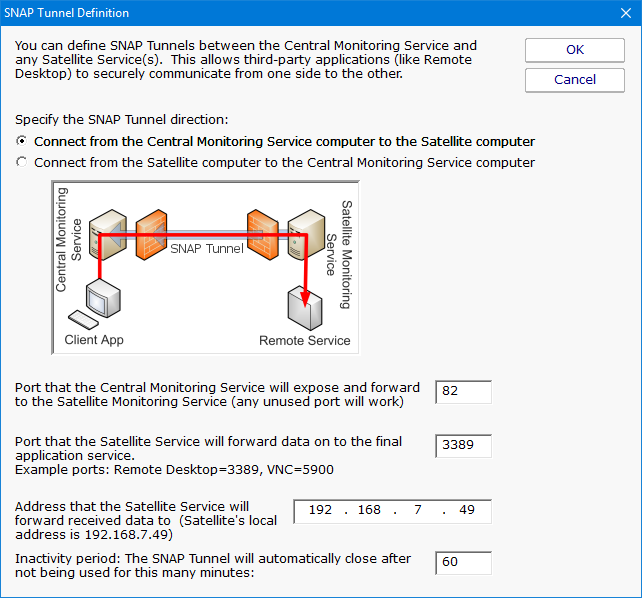
SNAP Tunnels are defined by choosing a direction (from Central Monitoring Service to Satellite, or the reverse), a destination IP address, and source and destination ports. Once defined, data arriving at the source port will be securely forwarded to the destination port. A timeout value can also be specified to automatically close the SNAP Tunnel after the given amount of inactivity time expires.

In the diagram above, the red arrow indicates the direction that connections take place. The destination port is 3389 which is the typical Remote Desktop port. So a client that connects to the computer where the Central Monitoring Service is running, on port 82 as shown above, will actually get forwarded to and connect to the remote network's 192.168.2.200 on port 3389. That means the Remote Desktop client can connect to port 82 on the local computer and actually have an RDP session with a remote computer, even though the remote computer has not opened any ports in the firewall.
Existing SNAP Tunnels can be seen by right clicking a Satellite and choosing Show Existing SNAP Tunnels as described in Satellite Operations.
SNAP Tunnels have a couple of factors that make them very safe:
Additional Security Settings
If you don't ever want to use SNAP Tunnels, they can be disabled completely by setting the following registry value on the Central Monitoring Service:
With this value set, all SNAP Tunnels will be blocked. You can also set the value on individual Satellites to disable SNAP Tunnels to that Satellite.
To access devices which are not monitored (and thus access can't be check), set the following on the Central Monitoring Service:
The TUNNEL_CREATE external API call now requires a login. To go back to the legacy setting where a login is not needed, set:
The most common usage for SNAP Tunnels is for remote support, via Remote Desktop, VNC or another remote control client. Other applications can be used as well -- just point the destination port at the remote service's listen port and IP address. Then connect the client application to the local side of the tunnel.
For example, if you want to connect using VNC to a computer at a client's office, and the client's computer IP address is 192.168.5.12, set up the SNAP Tunnel as follows:
Launch the VNC client at point it at: {Central Monitoring Service IP address}, port 9000. VNC will connect and be forwarded to the client's computer.
Note that the above example used VNC and requires the VNC listener to be running. Remote Desktop is typically running and available on most Windows servers and is therefore often an easier option.