- Solutions
-
- File Server: Ransomware Protection
- File Server: File Copy
- File Server: Audit File Access
- File Server: Storage growth reporting
- Licensing/Pricing
- Contact
Access Control allows different remote users to have different access to the monitored servers. For example, system administrators usually need to see everything, but particular groups or customers might only need to see their own servers.
Reports for servers or groups that a user can't access will be hidden from them. If they some how find a URL to a report that they aren't allowed to see, the report will be blocked.
To change the Access Control settings, launch the Console on the server where PA File Sight is installed. Go to Settings -> Remote Access -> Filter User Access.
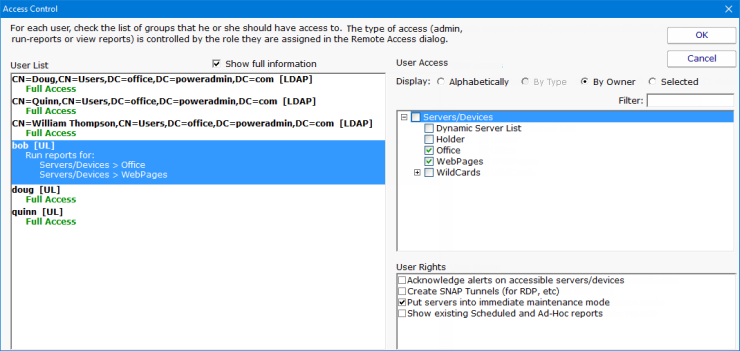
The Access Control dialog is a simple one. On the left is a list of users. Names that have [UL] after them are defined in the UserList.txt file. All other users shown were found in the specified Active Directory OU (specified in the Remote Access dialog).
Below each name is a summary of their current access. "Full Access" is shown for users that can see all servers/devices being monitored.
Two Factor Authentication can be enabled on a per-user basis. Double-click on the username to enable or disable 2FA. When enabling, the user's email address is used to send them an email with a QR code. They can scan that QR code into their preferred TOTF (Timed-based One-Time Password) application, such as Google Authenticator.
When 2FA is enabled, the user will sign in with username and password, and then be prompted to enter the TOTP. This works on both the Console application and the web interface.
Users that have been enrolled in 2FA will show "2FA" on the right side of their username.
On the right side is a list of all of the groups defined. Access is controlled on a group by group basis. The groups can be sorted alphabetically, or in their normal hierarchical layout.
User Rights are extra rights that are typically given to users that have limited rights. Top-level administrators (administrators that have access to the top Servers/Devices group) automatically have all User Rights. Administrators that have restricted access do not necessarily have the rights below unless explicitly granted.
By default users have access to actions that are attached to a monitor that they already have access to. This User Right will give the selected user access to all actions defined in the system.
This right allows the specified user to acknowledge alerts on all servers/devices that they already have access to.
This allows the specified user to create SNAP Tunnels which are use for remote access among other things.
Administrator users automatically have the right to put servers into maintenance. This User Right allows you to grant this right to non-administrator users.
Allows the specified user to remove users from the User Block List.
This user option will allow a user to view the Scheduled and Ad-Hoc reports. When a user is selected in the User List and this check box is checked the user will be able to view the reports section in the console and in the web interface.

To change what a user can access, select the user account on the left. The right side will display a check box in each group that the user can access. Simply select the groups that the user will have access to. Switching to a new user or pressing the OK button will save the changes to that user's access control.
This dialog controls what a user can access. To control what type of access they have (administrator, run-reports or view reports) to the servers, go to Remote Access where each user's role is specified.