Hello dear readers,
In today’s article I will show you how to create your Linux DHCP server. DHCP or Dynamic Host Control Protocol is a service that provides automatic IP addressing to your network devices. The difference between assigning static IPs and using a DHCP server is that the IP assignment is done without the interference of System Administrators. By using such service you also have a centralized administration point to your whole infrastructure offering an easy way to add/change or remove an IP address from your hosts. Every network parameters can be automatically configured by the DHCP server: IP address, network mask, gateway, DNS servers, WINS server address, etc. This service works using the client-server model: the server sends messages using 67 (source) and 68 (destination) UDP port numbers while the client uses port 68 as source and port 67 as destination.
One of the main principles behind this technology is the use of “leased” addresses. This means that each client will be able to use a certain IP address only in the allotted time frame. Once an IP address has been assigned to a DHCP client, a lease-time duration is set. The client will contact the DHCP server periodically to “renew” its IP address. If for whatever reason, the DHCP server does not respond in time, the client will try to contact other DHCP servers by broadcasting a message throughout the network.
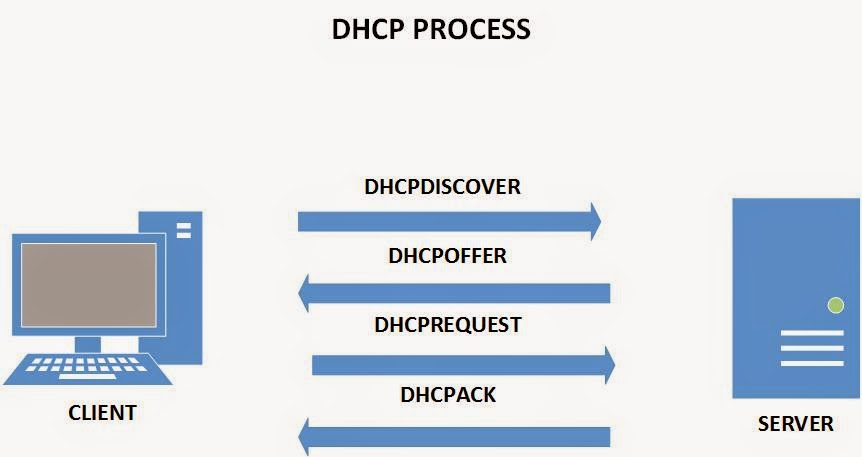
Before an IP is assigned to a workstation, several messages are exchanged between the DHCP client and the server. The following picture displays a typical DHCP process:
1. The client sends a DISCOVER message in which he tries to contact any DHCP server available on the network. This is a broadcast message that uses the UDP port 67 as destination. Unless there is DHCP-Relay configured on the network, this message will be blocked from any edge device (a router). This message can contain a desired IP address, the last used IP address and/or the lease time duration.
2. The server will respond with an OFFER message that contains all the network parameters. This is also a broadcast message that uses the UDP port 68 as destination.
3. When the client chooses a certain IP configuration, it will send a REQUEST message to the DHCP server to inform that the specified IP address has been chosen. This message is received by all DHCP servers and thus, all will know that the client has received its reservation.
4. The server will then respond with an ACK (Acknowledge) message and the network parameters will be sent to the client.
Below you will find other types of DHCP messages that can be exchanged between the client and the server:
Decline – the client will refuse to accept the IP allocation because this network address is used by another workstation
NACK – this type of message is sent when the server refuses to lease an IP address
Inform– when certain network parameters must be changed, the client will send an inform message to the server
Release – the client will inform the server that he doesn’t need the reservation anymore
BASIC NETWORK SETUP
For this example, I will install the DHCP server on a CentOS machine, you can choose whatever distribution you like because the configuration procedure is similar. You’ll need an active Internet connection if you choose to install the DHCP service using the yum utility. You can also choose to install the packet from sources, but I will not cover this part right now
To configure the network parameters, use eitherifconfig or ip command, as follows:
ifconfig eth0 10.10.10.50 network 255.255.255.0
ip address add 10.10.10.50/24 dev eth0
If you need to remove an IP address type ip address del 10.10.10.50/24 dev eth0or ifconfig eth0 delete 10.10.10.50.
The default route/gateway address can be configured by typing the following command:
route add default gw 10.10.10.1 or ip route add default via 10.10.10.1
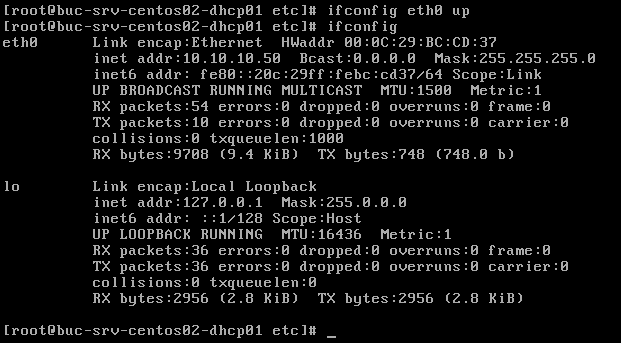
Once the network parameters have been configured, we’ll need to enable the network interface by typing ifconfig eth0 up
To disable a network interface, type ifconfig eth 0 down
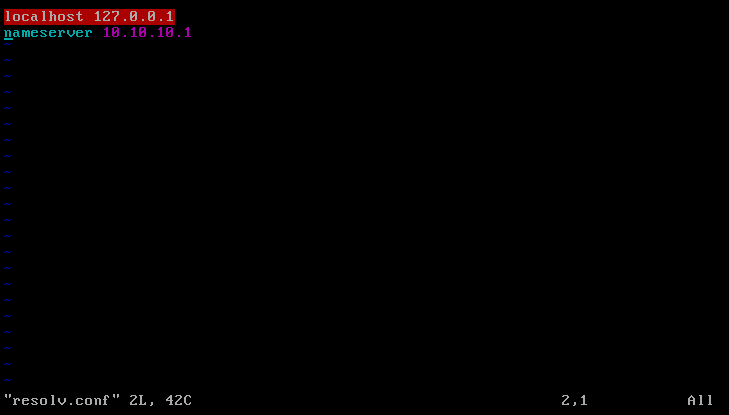
We’ll need to add the DNS servers used by our DHCP machine. Navigate to /etc/resolv.conf and edit this file using your favorite editor. Once you’ve opened the file, type in the following:
nameserver DNS_SERVER_IP_ADDRESS
Add one entry per line for each DNS server’s IP address
SERVER CONFIGURATION
Now you should be able to ping any website and we are ready to install the DHCP service. There are several things that you’ll need to know before we can proceed with the installation:
- The DHCP service is called dhcpd (DHCP Daemon) and once we’ve configured it, we will see this process running on our machine. You can verify if dhcpd is already running on a machine by typing ps –el | grep dhcpd.
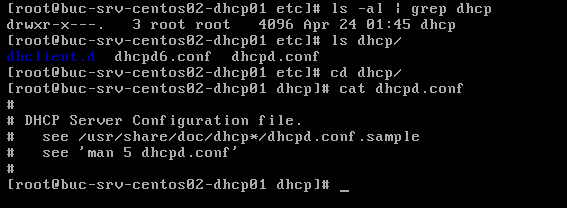
- In CentOS distributions, the configuration file is stored under /etc/dhcp/dhcpd.conf. We’ll need to modify this file to successfully configure our server. Note that if the installation is made from sources, this file will have to be created manually:
As you can see from the output, in CentOS, the conf.file is empty so we have to enter all the configuration entries manually. An example can be seen in /usr/share/doc/dhcp*/dhcpd.conf.sample. Once the configuration is finished, we can validate it by using the dhcpd -t command.
To install the DHCP service, type in yum install dhcp and wait for the installation to finish. If you don’t know whether your server has this service installed, try to execute the yum install command and you’ll receive the following message:
You can also use the rpm –qa | grep dhcp command to verify if the rpm package exists on the server.
After the installation has been successfully completed, it’s time to configure our DHCP server by editing the configuration file. Simply copy the content from /usr/share/doc/dhcp*/dhcpd.conf.sample to /etc/dhcp/dhcpd.conf. To achieve this result, type in cat /usr/share/doc/dhcp*/dhcpd.conf.sample > /etc/dhcp/dhcpd.conf
In the next article we’ll customize our DHCP installation and configure our machine to allow IP address lease to our DHCP clients. By now you should have a CentOS server with all the network parameters configured to allow communication with the whole network. Also you should have installed the DHCP package with a sample configuration file. Hope you’ve managed to cover all these steps because they are crucial for our final DHCP deployment. Don’t hesitate to post any questions on this subject and I’ll try to respond as soon as possible. Wish you all the best and stay tuned for the following article!


