We’ve talked in a previous article about DFS namespace and we’ve seen how to install and configure this feature on two Windows Server 2012 machines. Now that we’ve configured our DFS namespace it’s time to enable DFS Replication and allow file transfer between servers. Note that by now you should have two Windows Server 2012 machines both hosting DFS Namespace and DFS Replication services. Servers were configured to host our DFS Namespace and a shared folder was added to it.
To enable DFS Replication (DFSR) you will need to open the DFS Management console and navigate to the Replication section. Right click this section and select New Replication Group:

In the first part of the Wizard we’ll need to select the replication group type from the two available options. Multipurpose replication group and Replication group for data collection. Since we want to allow replication between our two machines for publication and content sharing, we will select the first option:

Next we will need to configure the Name, Description and set the domain for the replication group:
Once these settings have been configured proceed to the Replication Group Members section and add both servers:

The Wizard then prompts for topology selection. There are three options available: Hub and spoke, Full mesh and No topology.
Hub and spoke – used with three or more servers. Each spoke can use one or more hub members to replicate data. Multiple hubs can be used for redundancy in case one of them becomes unavailable. Hubs should host the same replication data
Full mesh – can be used between two or more servers. It’s recommended when there are less than 10 machines. In a full mesh topology, data is replicated between all replication members. It’s recommended that you always use this topology if the DFS replication group is composed of less than 10 servers.
No topology – this option lets you enable DFS connections once the wizard is completed. Note that no replication will occur if the connections are not configured
We are using only two servers so, this section is not so relevant for now. Choose Full mesh and press the Next button.

Replication can be configured to run continuously by using a specified bandwidth or by specifying a replication interval. When replicating many or large files, DFS can impact your network performance so make sure you choose the settings that suit best for your enterprise. I would suggest enabling DFSR during off-work hours or by setting a lower bandwidth dedicated for this operation:

Until all DFS servers finish replicating data you will need to choose a primary replication member. This server will host the content we want to replicate to other DFSR servers. Remember that this is a temporary measurement to ensure data consistency until the replication process is completed:

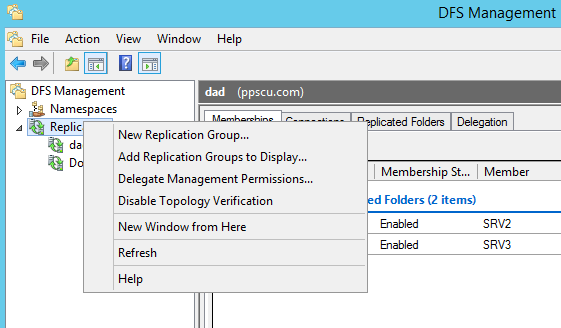
Once you’ve added all the folders needed for replication, finish the wizard and wait until the process is completed. The replication group will be available on the server on which it has been configured. You can add it to other DFSR members by right clicking the Replication section and selecting Add Replication Groups to Display:

Memebrship, Connections, Replicated Folders and Delegation can be configured once the group has been created. Check out each section before proceeding further:

You should now have a DFSR infrastructure up and running with two servers hosting the same data. Remember that namespaces are somehow independent and are not affected by replications. You can choose to use one or both technologies to provide network users a consistent data infrastructure. Hope you’ve understood how to configure DFSR on a Windows Server 2012 infrastructure, please use our comment section to post questions on this topic. Windows Powershell offers a lot of useful tools to configure and troubleshoot DFS and DFSR which we can talk about in the future. Wishing you a great day and hope you’ve enjoyed the article.

